

Magnetic Hat Decals : 8 Steps (with Pictures) - grillomurds1936
Introduction: Magnetic Hat Decals
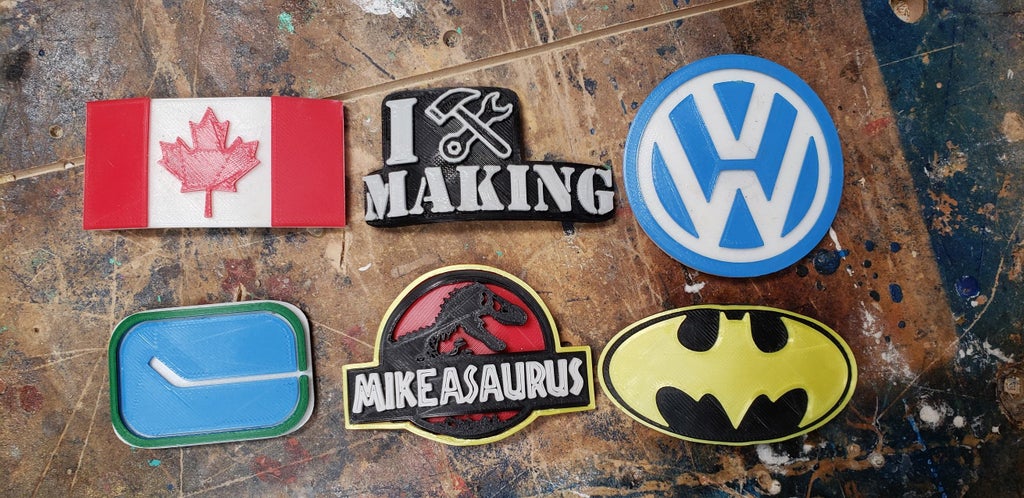
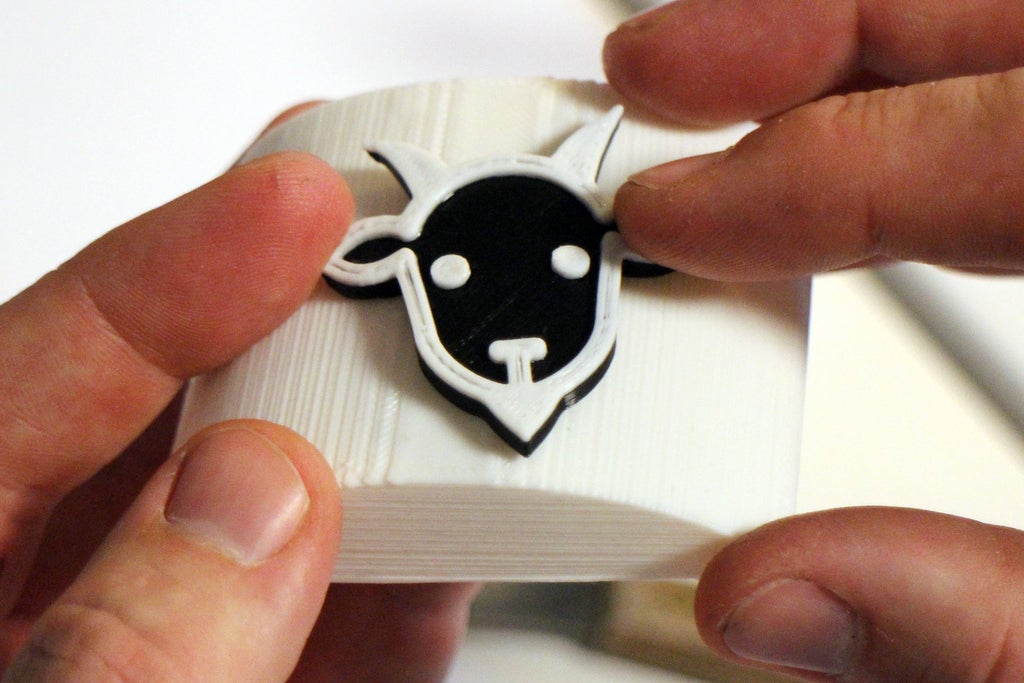
I love customizing my gear wheel: custom tools, custom railroad car badges, usage key jobs, symmetrical custom secret codes. I tailor-make loads of stuff, if I hindquarters. Notwithstandin, I have yet to invest in a screen printer to hold my own designs happening clothes. Making removable decals is the next best thing!
I've explored the concept of hat badges before, but this clock I wanted to have a way to change upward the decals happening my favorite hat instead of sewing them on. I also wanted something a small much a single people of color print, so these decals consume 2 Oregon more colors by swapping out filum while impression.

The process is straightforward: find a logotype you alike > get SVG of logo > signification and modify in Tinkercad > 3D black and white in a few colors > attention deficit hyperactivity disorder a magnet. Seems linear enough, but there was some trial and error involved to catch IT just right. I'll dive into the inside information of how I made these therein writeup, and you'atomic number 75 receive to use my magnetised hat decals designs as a starting point, or remix my designs in your own way of life.
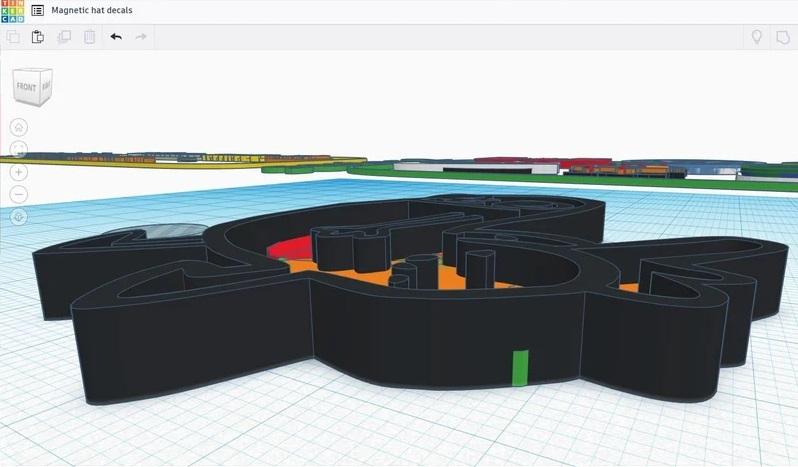
Explore the models below:
In the higher up example you can picture my design progress as I got more comfortable with the designing.
- Series 1: Easy prints that are small, and derriere be printed with only if one color (or to a greater extent, if you like), and as a single piece.
- Serial 2: These were intentional with two-fold colours in mind, written A a single piece (filament was changed partway through the print).
- Serial publication 3: I went mad and designed a 2-part decal with many colors (strand was changed partway through the print).

I'll discuss changing the filament colors in the printing maltreat of this Instructable.
Ready? Lashkar-e-Taiba's take in!
Step 1: Measurements
Using digital calipers to get an hi-fi measurement, the Nd magnets were sounded and the dimensions recorded. Naturally, we can e'er use the dimensions from the manufacturer, but I like to take my own measurements just in case of manufacturing inconsistencies, which I can call for into story away making big tolerances within my design.
These 12mm x 2mm neodymium magnets are inexpensive, and have plenty of charismatic force to hold on the decals to any hat or bag.
With measurements made, clock time to address design.
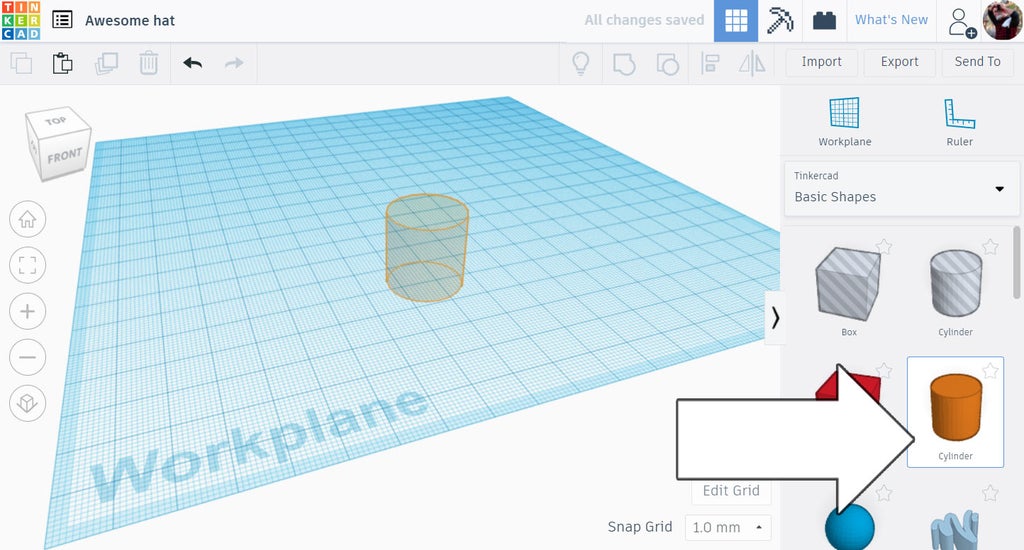
Ill-use 2: Design Integer Magnet
Start a new conception in Tinkercad, I placed a cylinder noncivilised onto the workplane that bequeath be my magnet - the rest of the hat will be designed just about this.
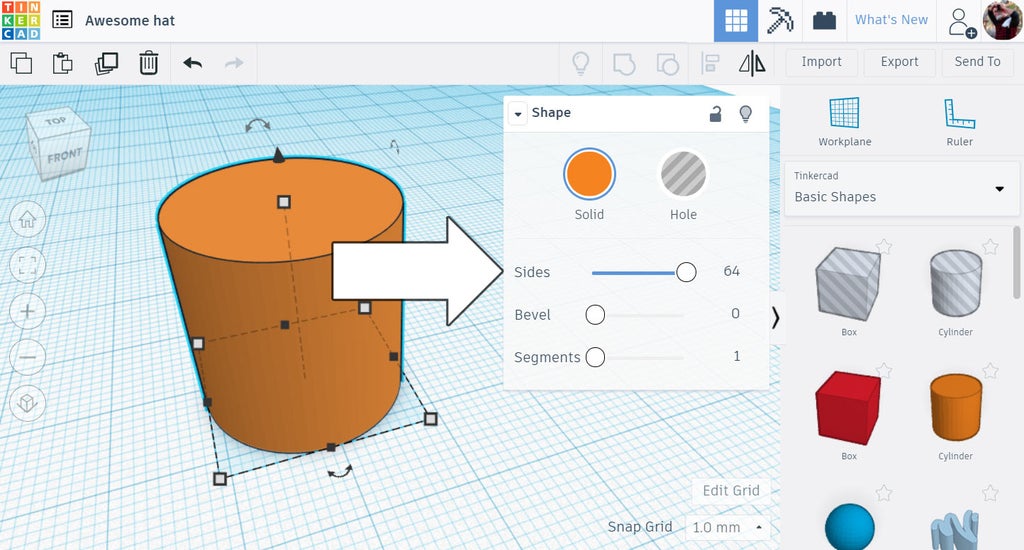
Once the cylinder is placed an choice bar pops up and allows you to progress to some changes to the shape, comparable changing the number of sides on the primitive shape. Away moving the Pseudemys scripta and increasing the number of sides the shape gets smoother. Since the magnets are smooth, we want the maximum number of sides to make our digital model match the real magnet we'll be using.
Click along one of the corner handles and a dimension box will appear, allowing you to type in the size in millimeters. 12mm aside 12mm.
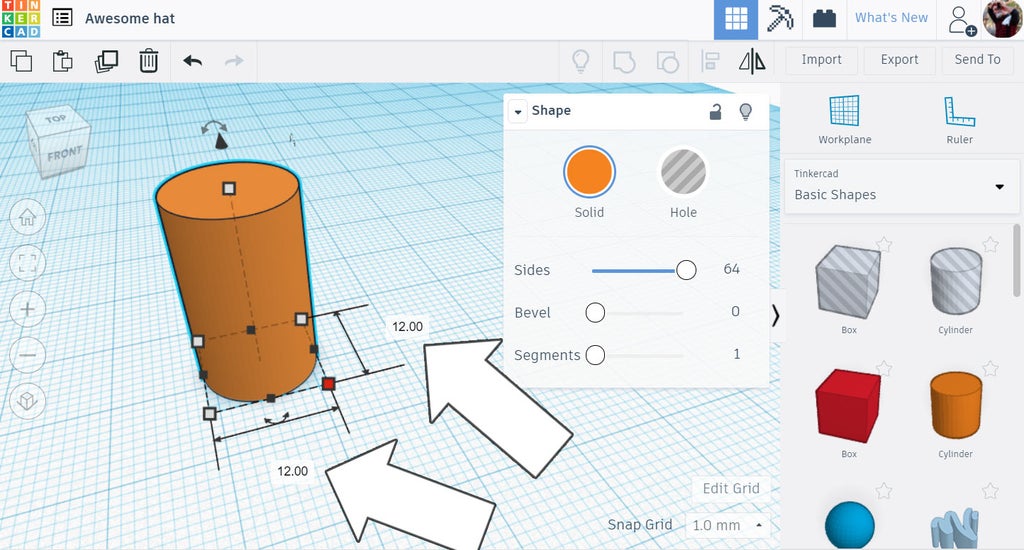
Clicking happening the top light-skinned handle will allow you to change the height of the object, in our case our magnet is 2mm high. However, I wished-for my attractive feature to not glucinium fully seated in the cavity we're creating for information technology. I deliberately successful the digital theoretical account .25mm shorter which will countenance the magnet to protrude 0.25mm from the spinal column of the print when it is inserted.
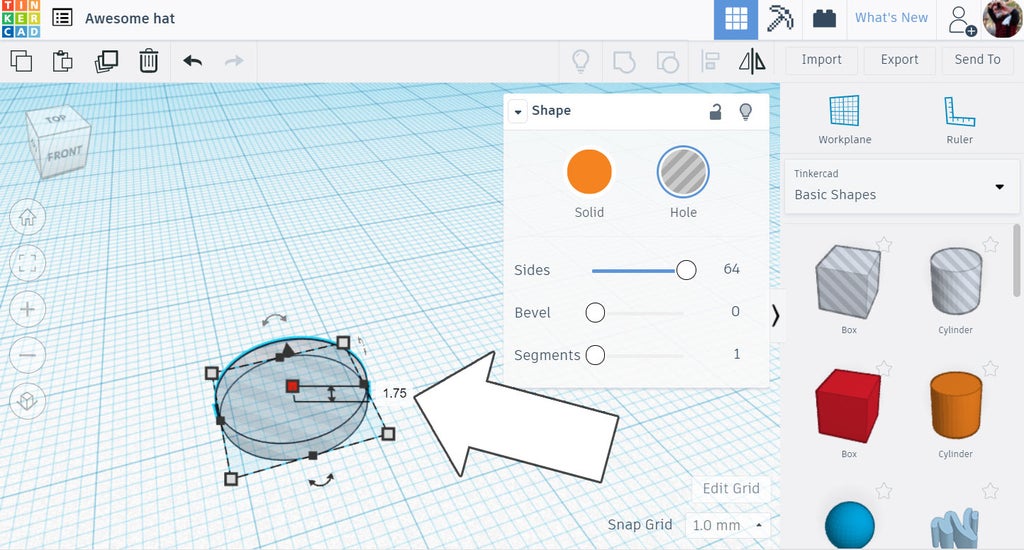
Lastly, the digital model of my magnet was denaturized from a solid to a hole from the mobile toolbar when the shape is selected.
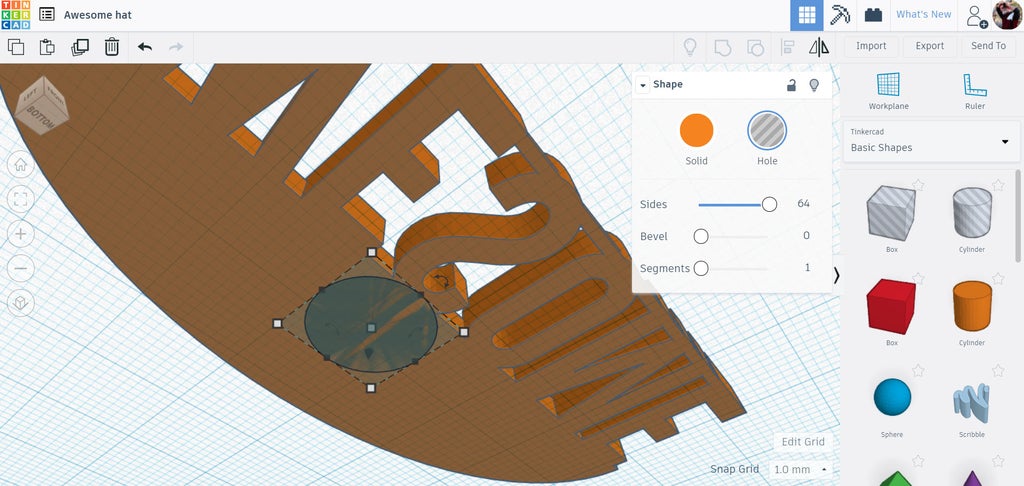
Step 3: Decal Intention
Your decalcomania can be well-nig anything you want, a logotype, words, or some. For simple shapes Tinkercad has a large depository library you force out build from. Yet, if you want a specific shape the easiest thing to do is import your excogitation into Tinkercad from an SVG file.
SVG is a file type that's vector supported (SVG stands for Scalable Vector Artwork), think of it like a math equation for the image. The SVG file contains wholly the information from the image and translates it to math, which substance it can make up scaled to whatever size and keep the same proportional geometry. This means Tinkercad can read the SVG file and knowns exactly how to build the image.

SVG files buns easily beryllium found online by adding "SVG" to your search full term. Wikipedia is another option that has oodles of SVG files of known graphics. For simpler designs a well behaved source is nounproject.com.
When you've downloaded your SVG files it's time to upload them. Tone for the import button on the top correct of the toolbar. Drag the SVG into the pop fly, Oregon graze your computer to find IT and so upload.
Sometimes the SVG imported comes in a lowercase foreign. Tinkercad sometimes has a troublesome time understanding some SVG files, either due to the geometry in the file cabinet Beaver State the way the SVG was created. There's a some options here:
- Test a different SVG file out.
- Edit the SVG in another computer programme (like Inkscape - which is free).
- Work with the uploaded SVG by adding or removing shapes to it from the Tinkercad library.
Assuming the last option, below is how I handled an SVG that only imported the outline

I added some standard Tinkercard shapes the roughly matched an area of the imported SVG, the ill-used the handles to reshape the piece until information technology overlapped the strange SVG. I found information technology easier to do this when the entire piece is scaled large, and the height of the SVG is taller than the Tinkercad shapes. The overall size can glucinium shrunk down to what we need later. Take your time Here, as care to point leave green goods better results when printing.
Above shows how I resolved this SVG file. It's not perfect, but hopefully some errors here won't be noticeable when it's printed.
Footstep 4: Place Magnet on Model
With the magnet shape connected the workplane, it nates now be placed anywhere on the hat decal. Magnet placement is something you should be cerebration about as you design your decal. IT's usually a good idea to center the magnet on the decalcomania, but it's scathing to make sure the magnet placement is someplace that has enough material to completely hide the magnet. Indeed, if the magnet is 1.75mm highschool and of necessity 1.5mm of depth, the model will need to be leastways 1.75-2mm deep wherever the magnet is placed.
In the example shown here the attracter can be moved round to the thicker part of the model to completely conceal the attracter.
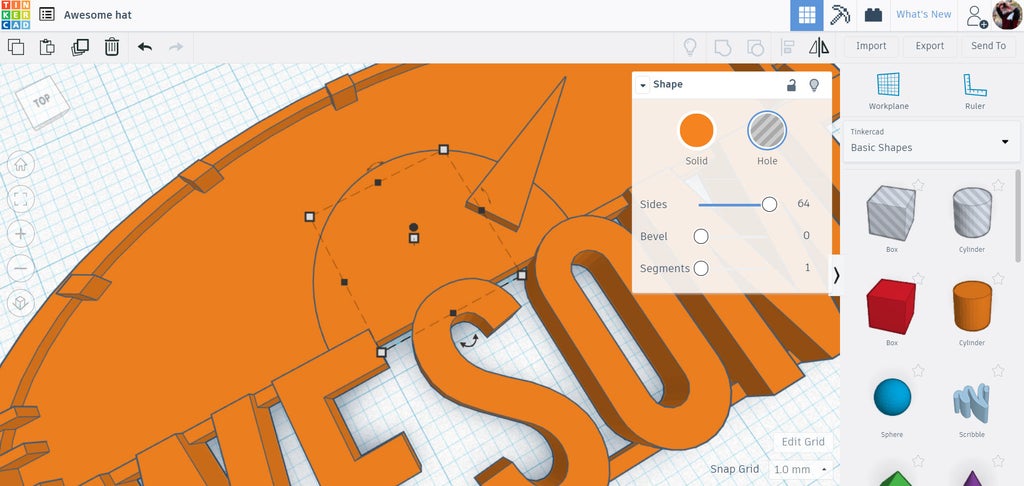
When the attracter is located in a suitable place, select both the decal and the magnet hole and corporate trust the two to make i embodiment with a caries in your decalcomania for the magnet.
Step 5: Printing
Export your model from Tinkercad, then load up that file into your slicing software. Printing the decals with the flavourless back on the build plate makes the just about sense, but leave require support material in order to print the magnet cavum correctly. Make sure you have "generate supports" checked in your slicer.
It's also of import to tab your slicers settings for "tipto/prat settings", since the top of the mark will be the front face of the decal we want to ensure there is maximum quality here. For your elevation settings you'll wish a few layers, I used 5. Experimentation with your printer will yield the best results, simply that's what I utilised and the prints came out great.
Above is a screenshot of my slicer, Cura. It's a free slicer and works well.
Notwithstandin, if you really want to take things to the close level you'll want to use more than ace color strand for your decals.
If you want more counterpoint in your prints, and you've only got memory access to a single extrude 3D printer, you can easy switch filament colours. Once the printing machine has reached a height to cover the magnet cavity only pause the print and trade out the loaded fibril for a new color, then continue the print job. In that respect is a method acting to qualify the G-code to automatically stop the photographic print at a certain level height, but I find that superfluous. These chapeau decals are small enough that I could easily time when to change filament. If you stimulate planned your decal with decent height between the colours you want there testament be a cowcatcher for the color change.
Step 6: Adding the Attractive feature
To push button the magnet snugly into the cavity in the back of the print I used untoughened rattle on plyers, which South Korean won't mark skyward the surface of either the magnet Beaver State the print as they are pressed into place.
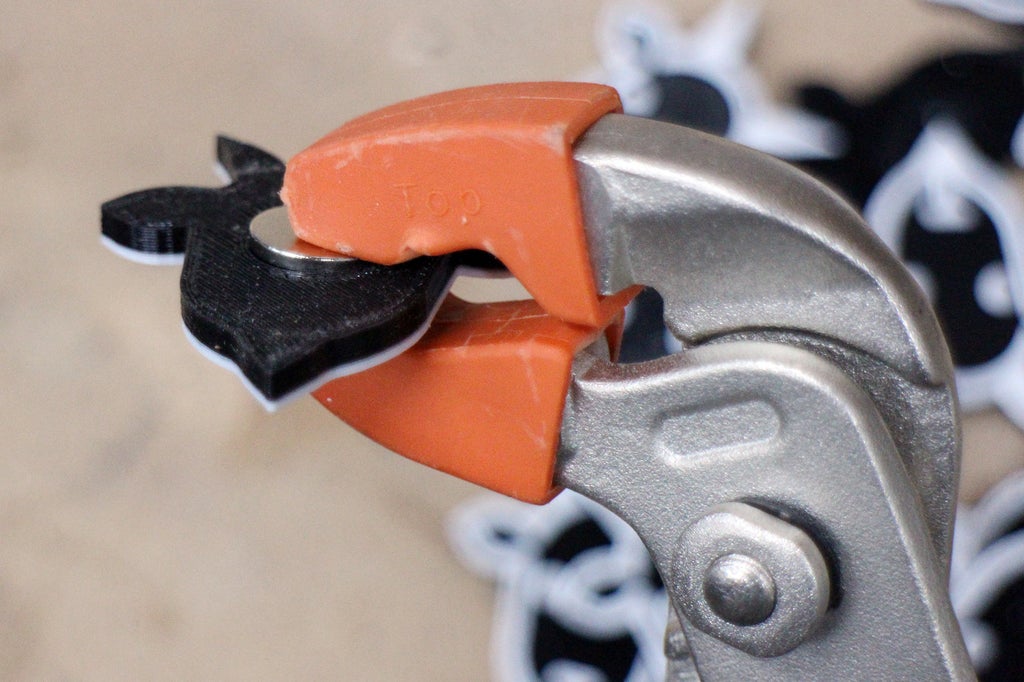
I've base that the magnets ass beryllium ironed into the impress with just an disturbance fit, using the very tight tolerence between the diameter of the magnet to the slightly smaller diameter of the cavity to hold the magnet in situ. However, a piffling dab of E6000 doesn't hurt.
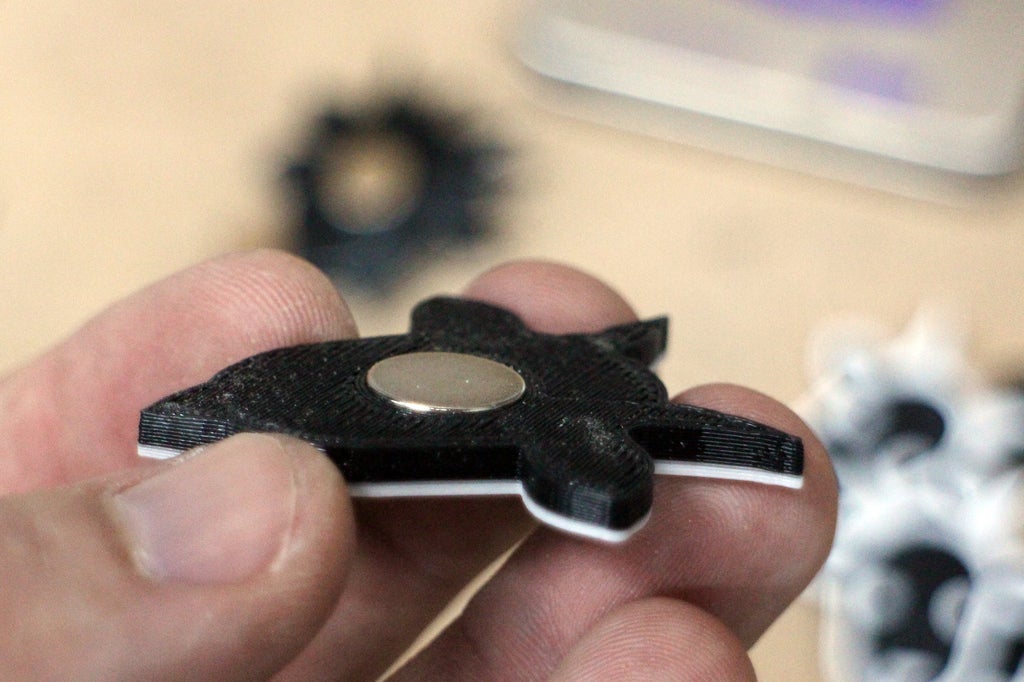
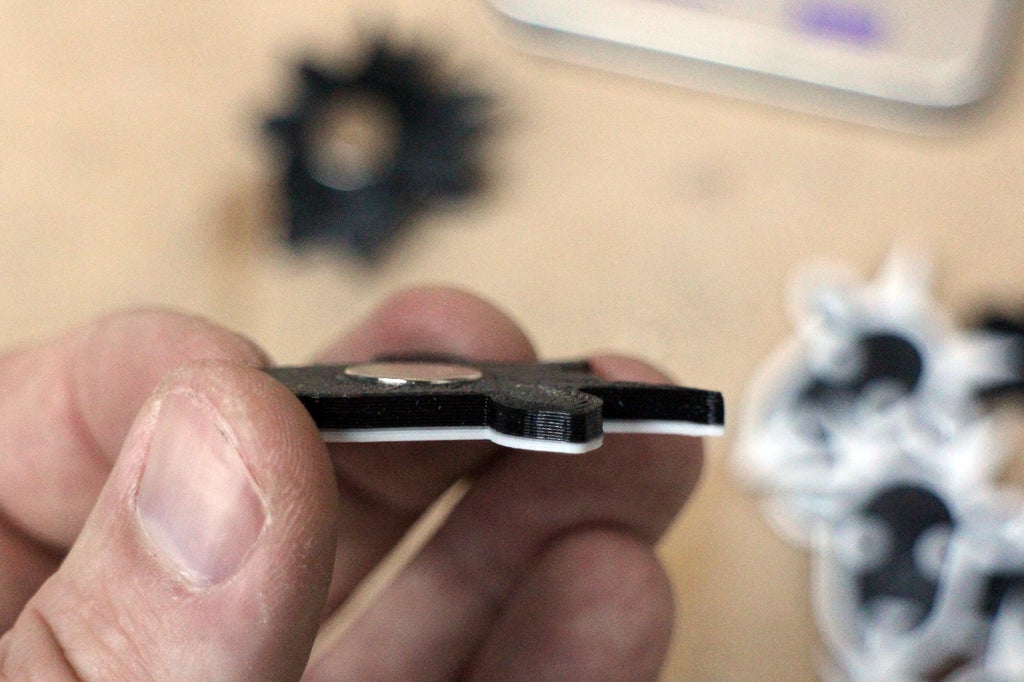
Here you can see the magnet sitting in the pit, merely protruding a tiny amount from the back face of the mark. This deliberate offset allows the magnet to have a healthier itinerary of reach to the mating magnet on the other side of whatever you are putting these decals on (hat, backpack, shirt, etc.)
Step 7: Adding a Curve
I've found that these hat decals look the best when they have a slight veer to them that follows the curved shape of the hat. I did this by designing and printing a curved block shape to use as a form that follows the contour I wanted. You can find this shape in the Tinkercad file for this project.
PLA filament is easy manipulated after printing by using hot water, then my decals were dropped in a muckle of boiling water for about 20 seconds, then with kid gloves removed with pair of tongs and shaped against the curved block.
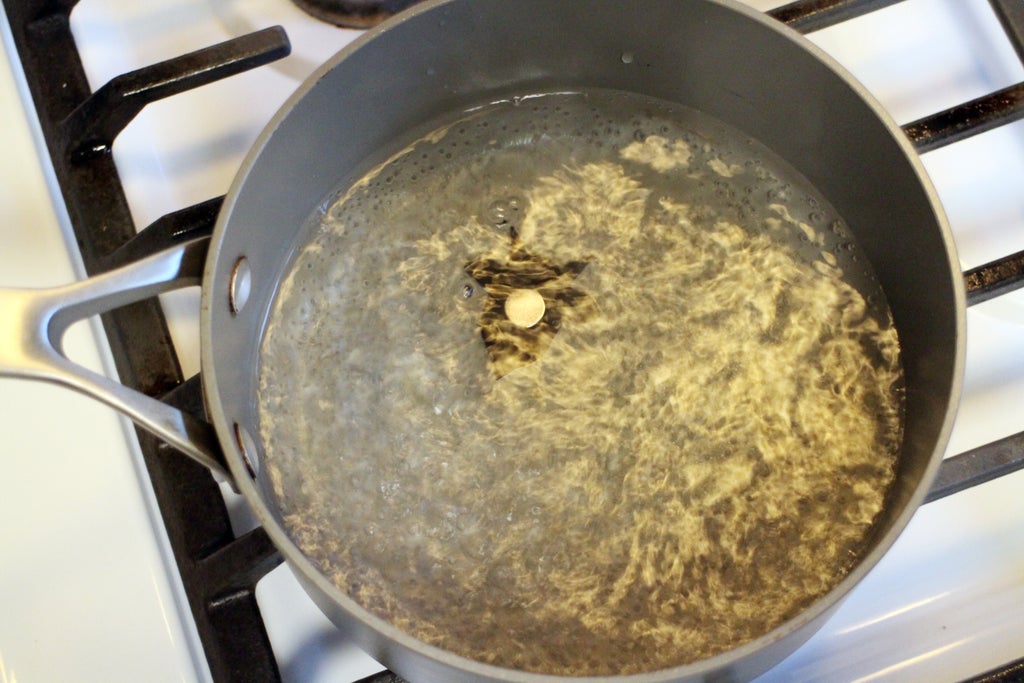
After removing the impress from the hot irrigate there are few seconds to press the print onto the curved manikin, material possession the print until it cools and sets with the new curve.
The decals will be HOT, so be careful not to burn your fingers!

Above, there's a impress instantly the 3D print bed on the right and the bent photographic print along the right.
Since this deforms the print slenderly, there's a chance that your magnet could pop out (depending on whether any viscous was used). I found that any magnets that came loose could easily be reinstalled into the cavity.
Step 8: Magnet Inside
To hold the magnetic decalcomania onto your hat (operating theatre whatever else you want them on), some other magnet was used on the inside of the garment. This magnet can exist secured in piazza with an sticky, sewn into the garment, or just left floating so you give the sack move it wherever you need. This is perfect for when you need to clean Oregon wash your garment, or when you want to commute up your decal.
3D written decals are a dandy agency to customize your gear, and with multiplex colors you've got a sharp sounding designing.
Have you made these decals, or been inspired to make something similar? I want to see it!
Share your versions in the comments below.
Happy Making :)
Be the Number 1 to Share
Recommendations
Source: https://www.instructables.com/Magnetic-Hat-Decals/
Posted by: grillomurds1936.blogspot.com
0 Response to "Magnetic Hat Decals : 8 Steps (with Pictures) - grillomurds1936"
Post a Comment